Plug in any audio interfaces or USB microphones that will be used before starting REW and do not disconnect them while REW is running.
When using REW to make measurements it is best to exit any other applications, disconnect from the internet and disable any wireless networking. Interference on audio inputs from the wireless interface or high processor demand from other applications, anti-virus updates and the like can cause gaps in the generated or captured audio signals leading to incorrect measurement results.
The initial steps required to make room measurements are:
The various calibrations and level checks usually only need to be done once. If running REW for the first time it is best to read through these initial help chapters in sequence rather than jumping directly to the individual setup steps, however if your computer has already been set up using other acoustic measurement software you may be able to skip directly to Making Measurements.
On Windows platforms REW can use either the Java audio drivers or ASIO drivers, on other platforms only Java drivers are supported. The Java drivers on Windows offer two types of access to the interface, WASAPI exclusive or JavaSound's built-in access. JavaSound's built-in access only supports sample rates up to 192 kHz and only 16-bit data (based on the Java 8 runtime at the time of writing, Dec 2020). WASAPI exclusive access offers whatever sample rates the interface supports at the highest sample resolution it provides. Devices using WASAPI exclusive are prefixed by EXCL: in REW's device selectors. Note that WASAPI Exclusive is only available for devices that have the "Allow applications to take exclusive control of this device" option selected in the Windows audio properties for the device. On macOS and Linux 32-bit or 24-bit data is used if the interface offers it. Sample rates up to 192 kHz are supported on macOS, rates up to 1536 kHz on Linux. The sample rate and sample format/bit depth are shown at the bottom of the REW main window. Java drivers permit the input and output to be on different devices.
ASIO drivers on Windows support up to 1536 kHz if the interface offers that and a variety of formats depending on the driver. ASIO drivers support one ASIO device which must be used for both input and output and REW has no control over levels. Pseudo-ASIO drivers such as FlexASIO and ASIO4All create an ASIO wrapper around the WDM drivers for devices, allowing input and output through different devices.
If using the Java drivers REW defaults to using the audio input and output which have been set as the defaults in your OS. Those defaults may change as you connect or disconnect audio devices, and when using the default setting REW cannot determine the specific capabilities of the device such as the bit depths or sample rates it supports, so it is strongly recommended to select the specific devices, inputs and outputs you wish to use for measurement in the Soundcard Preferences panel and do not leave the selection as default. Click the Preferences button in the toolbar to display the panel. The device lists show all audio interfaces that REW has detected, when an interface has been selected the input and output lists show the available inputs/outputs on that interface. ASIO devices appear in the list if they have an installed driver even if the interface is not connected, connect the interface to populate the list of supported sample rates.
Note 1: if a USB interface is plugged in after REW has been started it may take up to 1 minute for it to appear in the list of devices - this is a feature of the Java Runtime Environment.
Note 2: if ASIO4All is being used and a change is made in the ASIO4All control panel to select other devices or inputs/outputs REW will need to reload the ASIO4All driver before it can display the newly available channels. To do that use the Reload button to the right of the ASIO Control Panel button.
When using the Java drivers the lists may include both internal and external
devices and default drivers offered by the operating system.
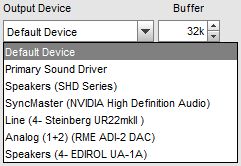
Where possible, select the interface itself rather than the OS drivers "Primary Sound Capture Driver", "Primary Sound Driver", "Java Sound Audio Engine" or similar. REW needs direct access to the controls on the interface if it is to automatically detect levels, this may not be possible if the OS drivers are selected. Java Sound Audio Engine is also prone to pops and clicks during playback which degrade measurements.
Once the devices have been chosen, the input and output can be selected. When using Java drivers the input will typically be called "LINE_IN" or "MICROPHONE" and the output will be "SPEAKER" or "LINE_OUT", however these names may be different for USB interfaces - for example, the input may be labelled "Digital Audio Interface". ASIO devices have more specific names for the available inputs and outputs and each mono channel will be listed separately.
When using a USB mic with a cal file that contains a sensitivity figure REW needs to read the input volume setting to correctly show SPL, to allow that the input device and input for the mic must be selected (they must not be left as "Default Device").
There seems to be a growing trend for Windows laptops and PCs to apply noise cancellation processing to stereo microphone inputs, suppressing the content that is common to both channels. With USB microphones like the UMIK-1 the signal is the same on both channels, so it is all common content, and low frequencies may be heavily suppressed. If there are user controls for noise cancelling processing on inputs make sure they are off for the measurement input. Processing for an input can be turned off by going to the Windows Sound Settings, then selecting Sound Control Panel under Related Settings. Select the microphone to be used from the Recording tab then click the Properties button and select the Advanced tab. If there is an Enable audio enhancements box make sure it is not checked. Processing should not affect WASAPI exclusive devices.
Trouble-shooting tip: To prevent REW from accessing interface volume controls, uncheck the Control input volume and Control output volume boxes. Any level control settings will then need to be made using the OS volume controls and/or the interface's mixer.
When using Java drivers a channel may be selected after choosing an input or output. Interfaces typically provide stereo inputs and outputs, so the measurement input can be Left or Right and the output can be Left, Right or, to send the measurement signal to both channels, Left+Right. On Windows Java's built-in drivers only offer stereo connections even if the interface connected is configured for or supports multi-channel, for example an HDMI output offering multi-channel PCM audio. Use the WASAPI exclusive entry for the device to get multichannel access, or use ASIO drivers or an ASIO wrapper like FlexASIO or ASIO4All. WASAPI exclusive checks for common channel counts up to 16 channels and sample rates up to 1536 kHz. If an interface does not offer the expected channel counts it is possible to configure REW to test specific WASAPI exclusive channel counts through an entry in the roomeqwizard.vmoptions file, for example -DcsjsoundChannels=1,2,4,32 will mean devices are only checked to see if they support 1, 2, 4 or 32 channels.
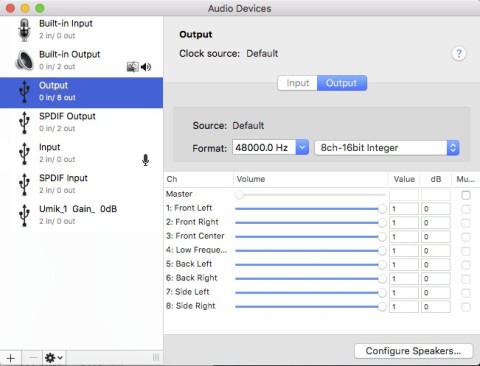
On macOS and Linux
a device configured for multi-channel can make all its channels available. An
example of selecting from any of the 8 outputs of a multichannel card on macOS is
shown below, the card is configured for 8-channel, 16-bit data at 48 kHz as shown
in the Audio Midi Setup image. Note that macOS has an unusual channel order for this
card, with the back channels appearing in the list before the side channels. REW
labels the channels in order as Left, Right, C, LFE, SL, SR, SBL, SBR but on this
card selecting SL (for example) in REW produces output on the left channel of the
connector marked Rear on the interface and SBL produces output on the left channel
of the connector marked Side. That oddity aside the channels are individually
selectable, and any unusual channel assignments can be dealt with using the
Output Channel Mapping control.

When using ASIO drivers sample rates up to 1536 kHz will be offered, if the interface supports them. Large buffer size (high latency) is recommended for ASIO, especially at higher sample rates. Reliable operation at high sample rates depends on the computer speed and RAM.
The Java drivers offer sample rates up to 192 kHz on MacOS, 1536 kHz on Linux and rates dependent on the device capabilities when a WASAPI exclusive dive is selected. Devices may only be available for 44.1 kHz and 48 kHz depending on the OS and the devices. If WASAPI exclusive is not being used make sure the input and output devices are configured in the OS to operate at the rate selected in REW, otherwise the OS will resample between the selected rate and the rate at which the input or output device is actually running. WASAPI exclusive devices may offer multiple sample rates, in which case the available rates will appear in REW for selection and the device will operate at the selected rate, or may only operate at a single rate which is configured by some other means. For example, RME interfaces may require the sample rate to be chosen in the MADIface Series Settings dialog and the rate selected there will be the only rate available for that device.
It is best to use 44.1 kHz or 48 kHz for acoustic measurements unless the test specifically requires measurement results above 20 kHz (studying tweeter resonances, for example). Higher sample rates increase memory use, slow down processing and do not improve accuracy.
This step is not applicable when using a USB microphone as the input,
skip directly to Check levels
Once the audio input and output have been selected REW is ready to make a
calibration measurement of the interface's frequency response. This is important
to check that the interface is configured correctly, particularly to ensure that
monitoring is not active - if any of the input signal is routed back to the output
measurement results will not be valid. The calibration result can be used to remove
the interface's response from measurements.
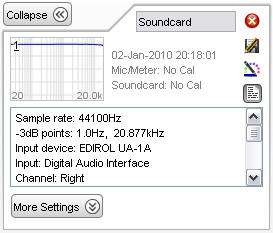
Note that interface measurements made from the Soundcard Preferences panel use the full sweep range to half the interface sample rate, regardless of the sweep end frequency setting, and the soundcard calibration file is NOT applied to such interface measurements
Note also that the soundcard calibration file is only valid for the sample rate at which it was measured, if the sample rate is changed the interface should be re-measured at the new sample rate
The next step is to Check levels